DGI – FABRICATION OF TOPS
Whatever DGI GLULAM item is being made, the sequence of construction and finishing processes remain the same. Remember, timber works easily, and commonsense and care are your best tools. In general this is what you will need to do:
1. Design
Prepare a cutting list. DGI or your supplier will assist and offer advice as to the availability of sizes and timbers.
2. Preparation
i) Read and act upon DGI Leaflet No. 2 “STORAGE & HANDLING – TOPS” that has been delivered with your DGI GLULAM.
ii) Select and number each board. Mark the approximate position and direction of all cuts then dock the boards leaving overtrim.
 3. Shooting the Edge
Edges need to be dressed true (shot), as they will not necessarily be straight enough for following operations (Joining for width, corner joints, splashbacks, aprons etc.)
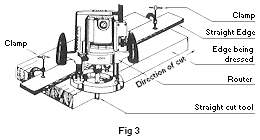
Shooting can be achieved on a jointer or spindle, but if neither are available, a router and straight edge can be used (see fig 3).
Run the router anticlockwise against the straight edge; this helps prevent chipping out. Don’t try and cut the full depth off in one pass: take 4-5mm at a time.
4. Joining to make a wider board
i) Shoot straight the two edges which go together (see section 3).
ii) Machine and insert “Lamella” type joining biscuits or groove with a router and insert 6mm thick plywood slip tongues, each about 100mm long.
iii) Apply a full strength epoxy glue to both edges as well as the joining biscuits/slip tongues and insert them.
iv) Bring the two boards together and clamp in place with bar or pipe clamps spaced about 450mm apart. Bolt clamps (see section 7.3) can be used, but be careful that boards remain in the same plane (ie. flat).
5. Ripping the Width
Rip all boards to the required width. In calculating the finished width allow for the thickness of aprons, splashbacks etc. Also check if there are any out of square corners that require extra width for trimming (see Section 7).
6. Rebates for splashbacks/aprons
(Refer also to Sections 8 and 9).
If a splashback with cove, cove only or rebated apron is to be fitted, the rebates should be done at this time. Use a spindle or router.
7. Corner Joints
 Recommended corner joints are MITRES or full BUTT joints. Mason’s mitres are not recommended.
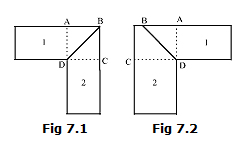
For mitre joints on boards of unequal width, (see fig. 7.2) a true mitre normally gives the best result as any movement is equalised, and the laminates will be close to matching.
i) Cutting the joint.
Cut on a panel saw; if unavailable use the router and straight edge method (see Section 3). Cut one board from the top and it’s mate from the bottom. This ensures any slight discrepancies are averaged. For out of square corners, make a template of the corner and increase the width of one benchtop leg and then rip it back to match the template.
ii) Biscuit or tongue the joint.
All corner joints should have “Lamella” biscuits or plywood slip tongues fitted (see section 4). Do not use dowels.
 iii) Bolt clamp the joint
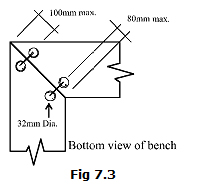
Bolt clamps (Mitre Bolts) (see fig. 7.3) should be fitted to the underside of all joints. 80mm from the front, 100mm from the back of mitres and 50mm in from both sides of Butt Joints.
For joints exceeding 850mm, fit an extra clamp midway between the others.
iv) Assemble the joint.
Dry assemble the joint, check level and fit and adjust if necessary. Sand the top to even out any variation in thickness.
Butt joints with opposing grain direction (see fig. 7.4) are NEVER TO BE GLUED.
For a butt joints where the grain runs in the same direction (see fig. 7.5); this is the same as widening a board and should be glued.

Mitre joints can now be glued unless they are to be left “open” to facilitate transport, access and handling. Open mitre joints should be glued on site.
8. SPLASHBACKS
Splashbacks can be fitted to the top, back or Rebated in if scotia/cove is used. (See figs 8.1 to 8.4.)

An alternative to fitting on top (fig 8.1) is to leave the splashback loose for fitting directly to the wall. Splashbacks running with the grain should be fully glued (See section 8.5).
Splashbacks with opposing grain must be screwed only. Pilot holes should be drilled (see fig. 8.6) and the benchtop end grain sealed (See section 13).

Note: Expansion / contraction of the benchtop caused by humidity changes will mean that the benchtop may change its position relative to the splashback. (ie. it may vary marginally from protruding or be shy of the splashback dependant on conditions.
9. APRONS/ DROP FRONTS/ FASCIA
 Similar to splashbacks but fitted to the front edges of the benchtop. They can be fitted to front, underside or rebated in. (see figs 9.1 to 9.3)
Aprons can be made using DGI GLULAM or solid timber. As with splashbacks, aprons must NOT be glued across the grain. If an apron is to run across the end of the benchtop it should be screwed with a fixing baton. (see fig. 9.4) or “build up the end grain” by slicing off sections of the benchtop end and gluing underneath (see Fig 9.5)

10. Holes / Cutouts
i) Cut prior to fitting splashbacks, aprons etc. to allow access of jig saws/routers. If a hole is to pass through a corner joint then assemble it (not necessarily glue). Holes/cutouts must have a 5mm clearance on all sides and corners should have a slight radius.
ii) Reinforce narrow cross grain sections.
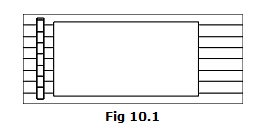
The distance between the end of the benchtop and a cutout and between cutouts should be at least 120mm. If this is not possible, reinforce the narrow cross grain section by recessing and gluing a piece of similar DGI GLULAM into the underside. Position the reinforcing piece so that its laminates are offset to the laminates on the benchtop. (see fig. 10.1) Do NOT use any other material or any DGI GLULAM with opposing grain direction.

11. Assembly
Any corner joint, splashback or apron with opposing grains must not be glued.
Use full strength Epoxy glues for like grain directions and Silicone sealant wherever there is opposing grains.
12. Sanding
I) Inspect the entire benchtop and repair any natural blemishes or dents.
ii) Apply the required edge profile on all the seen edges.
iii) Sand the surface and seen edges with 80 grit paper and repeat using 120 grit.
iv) Fine sand with 180 grit paper.
13. Finishing
Use 2 pack Polyurethane or DGI COUNTRY OIL. Ensure that all surfaces are clean, dry and free of contaminants.
ALL SURFACES MUST BE COATED with at least 4 (four) coats to provide an envelope seal. (ie. top, bottom, front, back, ends and the insides of all cutouts). Sand between coats (even on the bottom) with 180 grit paper.
14. Installation
Installation must be in accordance with DGI’s LEAFLET No. 3 (INSTALLATION GUIDE).
Please ensure you obtain a copy.
